Add

Wednesday 22 June 2016

PING : NETWORK TROUBLESHOOTER

Network Diagnostic tool

#Ping uses timed IP/ICMP ECHO_REQUEST and ECHO_REPLY packets to probe the "distance" to the target machine and since it's inception it's been part of Berkeley UNIX, many OS like Microsoft, Mac OS


Ping [Packet InterNet Grouper] can be very useful Internet network diagnostic tests.

Steps to be followed while troubleshooting Network Issue's

Ping the localhost: Ping to 127.0.0.1 address will always ping yourself,  
1)  You can check  Ethernet adapter is Fine or Malfunctioning.
2)  Also check  TCP/IP Stack is installed on local PC 


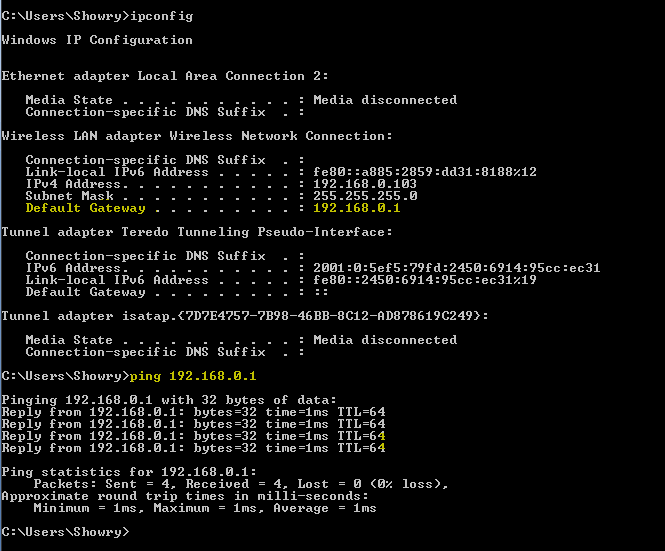
Ping the Default Gateway: Ping to default gateway address will always network interface is up and has default route ( you can get Default gateway in ifconfig or ipconfig command )

1) Incase ICMP is blocked using firewall you cannot get response back. 


Ping to Check Internet / Intranet servers:  Ping to see if you can reach another computer internet / intranet (8.8.8.8 google DNS server).

1) You test whether host is alive and current time taken to respond back to ping. 


Ping to check domain is UP & Get Domain IP address :  Ping can be used to probe domain is UP and get domain IP address.

1) Check whether domain is up. 
2) You can get the IP address of the domain.


Ping Life Cycle:
You can use the Ping command to determine how long it takes to bounce a packet off of another site, which tells you its Internet distance in network terms

  1. Source sends an ICMP ECHO_REQUEST to the destination.
  2. Ping program initialize an SEQUENCE ID which increments with each ICMP ECHO_REQUEST
  3. Ping initializes TTL (Time-to-live) period.
  4. Ping also inserts the sending time in the data section of the ECHO_REQUEST.
  5. Ping calculates ROUND_TRIPTIME, when host is responds with ICMP ECHO_REPLY back to the source.
  6. Ping with new ICMP ECHO_REQUEST increments the sequence identifier till user specified or default.


Ping statistics: Ping percentage of packet loss  number of packets transmitted, number of packets received, percentage of packet loss & round-trip time minimum, average and maximum.


Aliases - First thing to setup in Linux

Aliases are best made tools for making your life simpler in Linux.

You can set it temporarily ( session based )  or Permanent( edit /etc/bashrc ) or User specific( edit ~/.bashrc )

It reduces the typing effort of commands or groups of commands that are long and/or tedious to type.

Commands :  
# alias  name=' very big command with arg1 arg2...' 
# alias  name='script.sh' 

# alias dir="ls -al | grep ^d" 
# alias p="pwd"; l="ls -al"  

aliases can be used to increase the safety of the system by making commands interactive.

# alias rm="rm -i" 
# alias cp="cp -i"   

You can create your own user friendly commands


# alias dir="ls -al | grep ^d"  

Removing Aliases

unalias rm  
unalias cp   

Tuesday 11 March 2014

Grub2 Fedora 17 : Changing Background - Default - Timeout settings

Today GRUB2 ships out with most of the Linux Distribution as a default Boot loader. Let’s take some time to do customization.

Topics covered: 
               Changing your “DEFAULT OPTION” from Linux to Windows.
                Changing your “TIMEOUT OPTION” from default 5 sec.
               Changing GRUB2 background Wallpaper “SPLASHIMAGES” of your own.


Remember these configuration three files:
·         /etc/default/grub
·         /boot/grub2/grub.cfg
·         /etc/grub.d/<<Scripts>>

PART I
Whenever you install Linux above Windows(i.e Installing Windows OS at first and later installing Linux) “DEFAULT OPTION”  in boot loader will be set to Linux by default. Timeout is a delay waiting for user inputs before selecting default option. It’s necessary to change the DEFAULT and TIMEOUT Option for our choice.


Step 1) Identify the TITLE of Operating system which has to be loaded default.
NOTE: If you install windows first and above it Linux, Grub2 Boot loader will take care of identifying already residing OS’s. Grep 'Windows' or 'Fedora' or 'Ubuntu' keywords from the greub2.cfg file.

 #cat /boot/grub2/grub.cfg | egrep -i 'Windows|Fedora|Ubuntu'
 or 
 #cat /etc/grub.cfg | egrep -i 'Windows|Fedora|Ubuntu'


Step 2) Use #grub2-set-default command to set the new value of your choice. You can check the default entry using #grub2-editenv list to see the changes.
 #grub2-set-default='Windows 7 (loader) (on /dev/sda2)'   


Step 3) Update #grub2-mkconfig to update the grub.cfg file.

# grub2-mkconfig -o /etc/grub2.cfg
# grub2-mkconfig -o /boot/grub2/grub.cfg


Step 4) Update value “GRUB_TIMEOUT” in file /etc/default/grub
GRUB_TIMEOUT=20 [Value in seconds] 


Step 5) Update #grub2-mkconfig to update the grub.cfg file.

# grub2-mkconfig -o  /etc/grub2.cfg
# grub2-mkconfig -o  /boot/grub2/grub.cfg


Part II

However it isn't compulsory to change the default background wallpaper, but something of your own will always add attitude of you, I’m just touching background and font part in theme.


Step 1) Remove comment for GRUB_THEME line in /etc/default/grub
GRUB_THEME="/boot/grub2/themes/system/theme.txt"

    
Step 2) Download / Copy files to /boot/grub2/themes/system/{default theme parent directory}


Step 3) Edit theme.txt file in boot/grub2/themes/system/ with desktop-image=”value to latest background filename”.
    
desktop-image: "amithbackground.jpg"


Step 4) Update #grub-mkconfig to update the grub.cfg file
# grub2-mkconfig -o  /etc/grub2.cfg
# grub2-mkconfig -o  /boot/grub2/grub.cfg


Step 5)Reboot to see changes :)  .


Reference : theme.txt 
######################################################################## 
#general settings
message-font: "DejaVu Serif Regular 12"
message-color: "#fff"
message-bg-color: "#000"
terminal-box: "terminal_box_*.png"
terminal-font: "DejaVu Serif Regular 12"
desktop-image: "amithbackground.jpg"

#help bar at the bottom
+ label {
        top = 100%-25
        left = 0
        width = 100%
        height = 20
        text = "@KEYMAP_MIDDLE@"
        align = "center"
        font = "DejaVu Serif Regular 10"
        color = "#FFF"
}

#boot menu
+ boot_menu {
        left = 10%
        width = 80%
        top = 20%
        height = 50%
        item_font = "DejaVu Serif Regular 12"
        item_color = "#3c6eb4"
        selected_item_font = "DejaVu Serif Bold 14"
        selected_item_color= "#fff"
        selected_item_pixmap_style = "blob_*.png"
        icon_height = 25
        icon_width = 25
        item_height = 26
        item_padding = 0
        item_icon_space = 0
        item_spacing = 1
        scrollbar = true
        scrollbar_width = 20
        scrollbar_thumb = "slider_*.png"
        menu_pixmap_style = "boot_menu_*.png"
}

#progress bar
+ progress_bar {
        id = "__timeout__"
        left = 15%
        top = 80%
        height = 20
        width = 70%
        font = "DejaVu Serif Regular 12"
        text_color = "#fff"
        fg_color = "#3c6eb4"
        bg_color = "#294172"
        border_color = "#fff"
        text = "@TIMEOUT_NOTIFICATION_LONG@"
}


Thursday 6 March 2014

DATA migration : Using expdp/impdp for Data Transfer between Oracle Databases.

DATA migration : Using expdp/impdp for Data Transfer between Oracle Databases.
 
Unless Databases are in some version.release it won’t make an issue, But for example if you have Oracle 11.1.0.7 as source and wish to import it in 10.2.0.3.0 you should use version parameter along with expdp/impdp.
 
STEP 1: Sqlplus to source and target databases as sys : 
      # sqlplus / as sysdba

STEP 2: Specifying export/import dump directory:
 
      # CREATE DIRECTORY expdpump_dir AS /home/oracle[version]g/datapump and  exit.
 
NOTE: Exporting and importing can be done the using expdp/impdp in fallowing modes. 
 
Full Mode   : FULL=y
           Schema Mode : SCHEMAS=name1,name2,name3
           TABLES Mode : TABLES=Table1,Table2,Table3
          
Step 3: RUN export at Source:
 
#  expdp system/[PASSWORD]@[SID] schemas=[SCHEMA] DIRECTORY=expdpump_dir JOB_NAME=test DUMPFILE=[SCHEMA]_[SID]_[date]_%u.dmp logfile=EXP_[SCHEMA]_[SID]_date.log PARALLEL=4 VERSION=10.2.0.3.0
 
     Successful export output from log file : /home/oracle11g/datapump/exp_[SCHEMA]_[SID]_date.log
 
Dump file set for "SYS"."SYS_EXPORT_SCHEMA_01" is:
/home/oracle11g/datapump/[SCHEMA]_[SID]_[date]_1.dmp
/home/oracle11g/datapump/[SCHEMA]_[SID]_[date]_2.dmp
/home/oracle11g/datapump/[SCHEMA]_[SID]_[date]_3.dmp
/home/oracle11g/datapump/[SCHEMA]_[SID]_[date]_4.dmp
Job "SYS"."SYS_EXPORT_SCHEMA_01" successfully completed at 01:35:45


NOTE : Use  PARALLEL parameter depending on the number of CPUs(some says twice of CPUs cores, don’t try too much) on your server, %u in DUMPFILE implies that multiple files may be generated
 
NOTE : We should give the version parameter value as target database (Wherever we import) compatible parameter value.In my case impdp for : 10.2.0.3.0
 
 
STEP 4 : Transfer the Datapump to Destination dump dir’ “/home/oracle[version]g/datapump” use ftp or scp.
 
STEP 5 : RUN import at Destination :
 
#  impdp system/[PASSWORD]@[SID] schemas=[SCHEMA] DIRECTORY=dpump_dir1 JOB_NAME=test DUMPFILE=[SCHEMA]_[SID]_[date]%u.dmp logfile=IMP_[SCHEMA]_[SID]_date.log  PARALLEL=4 VERSION=10.2.0.3.0
    
Successful export output from log file : /home/oracle10g/datapump/IMP_[SCHEMA]_[SID]_date.log
 
imported "SYS"."SYS_OBJECTS"                           9.956 MB  101933 rows
Job "SYS"."SYS_IMPORT_SCHEMA_01" completed without any error(s) at 01:54:57
 
 
STEP 6 : Final but I always find very helpful – MONITORING the export/import job STATUS.I understand the pain of waiting for log file to be written, but understand this log file will be optionally written and you often suspect JOB may be NOT RUNNING. All I say is KEEP THE FAITH in expdp/impdp.
 
 
  >   SELECT owner_name, job_name, operation, state FROM dba_datapump_jobs;
 
OWNER_NAME JOB_NAME             OPERATION   STATE     
---------- -------------------- ---------- ------------
SYSTEM     TEST                  EXPORT     NOT RUNNING
 
Oh! Yes TEST EXPORT is NOT RUNNING.
 
STEP 7: KILL || STOP || RESUME || RESTART Datapump Jobs.
When exporting (or importing), press Ctrl-c to show the datapump prompt
 
     KILL_JOB  : Is something you cannot retriew the Job later, usually done when Job is in hung state.
    
           Processing object type DATABASE_EXPORT/SCHEMA/TABLE/TABLE_DATA
[Ctrl-c]
Export> KILL_JOB
 
     STOP_JOB : Can be reusmed later [STOP_JOB=IMMEDIATE] where you like to pause the datatpump job for some reason.
          
Processing object type DATABASE_EXPORT/SCHEMA/TABLE/TABLE_DATA
[Ctrl-c]
Export> STOP_JOB=IMMEDIATE
Are you sure you wish to stop this job ([yes]/no): yes

ATTACH  : Resume the Stopped JOB 

           # expdp system/[PASSWORD]@[SID ATTACH=[JOB_NAME]
 
 
     START_JOB: Restart the current job Use [=SKIP_CURRENT] and CONTINUE_CLIENT.
 
Processing object type DATABASE_EXPORT/SCHEMA/TABLE/TABLE_DATA
[Ctrl-c]
Export> START_JOB=SKIP_CURRENT
Export> CONTINUE_CLIENT
Job EXP_FULL has been reopened at Thursday, 09 June, 2011 10:26
Restarting "SYSTEM"."TEST":  expdp system*******@[SID] schemas=[SCHEMA] DIRECTORY=expdpump_dir JOB_NAME=test DUMPFILE=[SCHEMA]_[SID]_[date]_%u.dmp logfile=EXP_[SCHEMA]_[SID]_date.log PARALLEL=4 VERSION=10.2.0.3.0
 
Processing object type DATABASE_EXPORT/TABLESPACE

Wednesday 5 March 2014

Reset ROOT password in MySQL

Using init file while starting the mysql daemon to reset the password of root user in MySQL
 
Step 1) Prepare the init file at : /home/<<location>>/mysql-init - content as fallows
    
        UPDATE mysql.user SET Password=PASSWORD('MyNewPass') WHERE User='root'; FLUSH PRIVILEGES;

NOTE: 
You don't need the old password to reset for new, its like something when you forgot/don't know the root password 
 
Step 2)

    i)if you are starting first time after fresh installation

            ## /etc/init.d/mysqld start --init-file=/home/<<location>>/mysql-init & 
 
    ii)if your myslqd already running,     

         a. Kill or stop mysql daemon
            # /etc/init.d/mysqld stop
                or
            # kill -9 <<PID's of all mysqld process>>
         

         b. Start in safe mode

            # mysqld_safe --init-file=/home/<<location>>/mysql-init &
    

    iii)Stop and restart in normal mode to make effect.

             # /etc/init.d/mysqld stop

             # /etc/init.d/mysqld start